The WebLogic Server Administration Console comes with the feature to monitor and view JMS messages from WebLogic 9.x onwards. However it is a web-based (console) tool that is optimized for configuration, not monitoring and development testing. It can not do some advanced JMS activities like copy messages from one queue to another very easily. HermesJMS is an extensible console that helps you interact with JMS providers making it easy to browse or search queues and topics, copy messages around and delete them. It fully integrates with JNDI letting you discover administered objects stored, create JMS sessions from the connection factories and use any destinations found. Many providers include a plug-in that uses the native API to do non-JMS things like getting queue depths (and other statistics) or finding queue and topic names.
This little but powerful tool works with many of the popular JMS providers such as WebLogic JMS, Tibco EMS, JBoss MQ, Sonic MQ, WebSphere MQ, OpenJMS, SAP etc.
In this post we will see how to get Hermes installed and configured for use with WebLogic JMS.
1> Download the installer from HERE
2> Run “java –jar hermes-installer-1.13.jar” (at the time of writing this post the version available is 1.13, you may have a different JAR file name) in the directory where you have placed the installer jar.
3> Edit the
4> Create JMS module > Connection Factory > Destination (If you have an already existing Destination on WLS, then you may skip this point).
5> Launch Hermes by calling the hermes.bat
6> Right click on “sessions” and select “new -> New session”
7> Go to the “providers” tab at the bottom and add a “group” called “weblogic10” and a “library” specifying your path to weblogic.jar. Select “Don’t Scan” when prompted. (I am using WLS 10.0 GA for this posting)
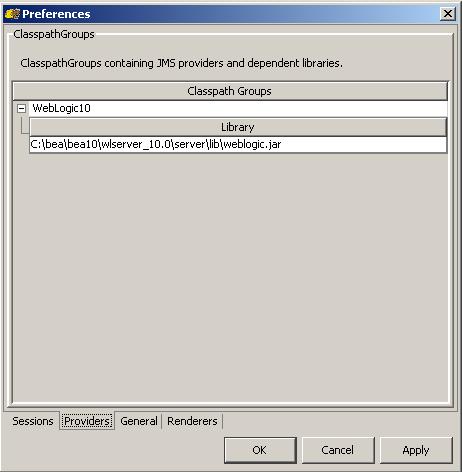
8> Save the configuration.
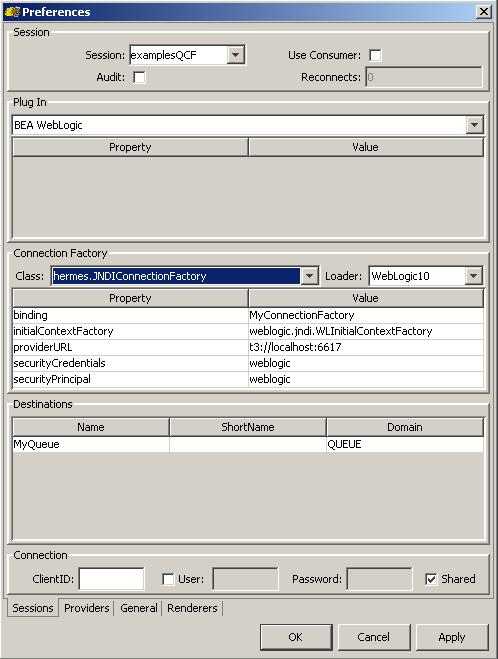
9> Click on the “Sessions” tab. Enter a name for the session (in this case “examplesQCF”). Select “BEA WebLogic” for the “Plug In” section from the dropdown. In the “Connection Factory”, select “weblogic10” for the loader. For the properties values refer the below image (binding, URL and credentials would be specific to your WLS settings).
10> Now right click on the newly created “examplesQCF” session and select Discover. It would list all the available destinations under the examplesQCF session.

11> Now right click on a single entry under the Session and select “Browse”, you should be able to see the contents of the queue.

If you are able to see something very similar like the snapshot above, that mean you have configured the Hermes properly.

