Tuesday, September 28, 2010

Browsing your destinations using Hermes

When we talk about the Messaging Middleware, administering the destinations is a must-have feature. A lot of queries come 'How to browse, search, copy, and delete messages from destinations'...

The WebLogic Server Administration Console comes with the feature to monitor and view JMS messages from WebLogic 9.x onwards. However it is a web-based (console) tool that is optimized for configuration, not monitoring and development testing. It can not do some advanced JMS activities like copy messages from one queue to another very easily. HermesJMS is an extensible console that helps you interact with JMS providers making it easy to browse or search queues and topics, copy messages around and delete them. It fully integrates with JNDI letting you discover administered objects stored, create JMS sessions from the connection factories and use any destinations found. Many providers include a plug-in that uses the native API to do non-JMS things like getting queue depths (and other statistics) or finding queue and topic names.

This little but powerful tool works with many of the popular JMS providers such as WebLogic JMS, Tibco EMS, JBoss MQ, Sonic MQ, WebSphere MQ, OpenJMS, SAP etc.

In this post we will see how to get Hermes installed and configured for use with WebLogic JMS.

1> Download the installer from HERE
2> Run “java –jar hermes-installer-1.13.jar” (at the time of writing this post the version available is 1.13, you may have a different JAR file name) in the directory where you have placed the installer jar.
3> Edit the /bin/hermes.bat or hermes.sh and set JAVA_HOME (if you do not have it set at the System level)
4> Create JMS module > Connection Factory > Destination (If you have an already existing Destination on WLS, then you may skip this point).
5> Launch Hermes by calling the hermes.bat
6> Right click on “sessions” and select “new -> New session”
7> Go to the “providers” tab at the bottom and add a “group” called “weblogic10” and a “library” specifying your path to weblogic.jar. Select “Don’t Scan” when prompted. (I am using WLS 10.0 GA for this posting)


8> Save the configuration.
9> Click on the “Sessions” tab. Enter a name for the session (in this case “examplesQCF”). Select “BEA WebLogic” for the “Plug In” section from the dropdown. In the “Connection Factory”, select “weblogic10” for the loader. For the properties values refer the below image (binding, URL and credentials would be specific to your WLS settings).


10> Now right click on the newly created “examplesQCF” session and select Discover. It would list all the available destinations under the examplesQCF session.


11> Now right click on a single entry under the Session and select “Browse”, you should be able to see the contents of the queue.


If you are able to see something very similar like the snapshot above, that mean you have configured the Hermes properly.

Tuesday, July 27, 2010

What is a connector (resource adapter)?

Connectors as the name specifies, are nothing but the way of connecting to different components of an enterprise infrastructure more like an USB (plug and play) components. And the specification it adheares to is the Java Connector Architecture (JCA).

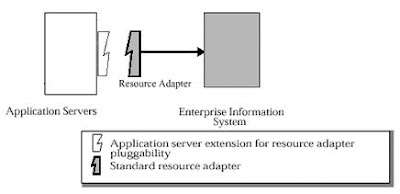
The J2EE Connector Architecture defines standard Java interfaces for simplifying the integration of enterprise applications with J2EE-based Java applications. With these interfaces, Java developers can access existing databases, ERP applications and legacy systems. The connector, also known as a "resource adapter," appears as a component library that the developer can access via Java programming language.

The JCA has two basic components, the Common Client Interface (CCI) and a set of system-specific services. An adapter developer provides an interface to CCI along with its side of the system contracts specified as part of the connector architecture. The application server vendor implements its side of the system contracts as part of its base J2EE platform.

CCI is a programming interface that application developers and client programs can use to connect and access back-end systems. It is a low-level API and similar to JDBC. Unlike JDBC, however, CCI can work with nonrelational systems. CCI manages the flow of data between the application and the back-end system and does not have any visibility into what the container and the application server are doing. Although it is possible for application developers to call the CCI directly, in most cases, an application developer will write to an abstraction layer, provided by the connector provider or enterprise application integration (EAI) framework vendor, to simplify the development process.

On the platform side, JCA defines a set of service contracts that a connector developer can expect will be available to the adapter at application runtime. Like CCI, the specification defines what services need to be present, and again, it is up to the application server vendor to provide the actual implementation.

To enable seamless integration with an application server, a resource adapter must abide by guidelines, known as system-level contracts. These contracts specify how a system external to the J2EE platform can integrate with it by supporting basic functions that are handled by the J2EE container. There are three major categories of these functions:

Connection management
The connection management contract allows applications to connect to an EIS. It also enables the application server to utilize pooling.

Transaction management
The transaction management contact allows an application to manage and perform transactional access across one to many EIS resource managers.

Security
The security contract provides support for secure access to the EIS.

How to build your own adapter

In this post we will try to demonstrate how to implement a JCA adapter - a set of classes with which a J2EE application server targets a particular enterprise system. A JCA adapter functions similarly to how a JDBC driver connects to databases. Developing a full-featured JCA adapter is a complex task. However, by the end, you will understand a basic JCA adapter's construction, and grasp the effort required to build your own.

This sample adapter will actually connect to an enterprise system. It only implements (for demonstration purpose) the interfaces required to deploy an adapter and look up a connection. (And we are not going to use Common Client Interfaces [CCI] either).

The adapter includes two class categories:

Managed classes: The application server calls managed classes to perform the connection management, required only if the application server is managing the connection through a connection pool.

Physical connection classes: These classes can get called by the managed classes to establish the connection to an EIS (enterprise information systems).

MyManagedConnectionFactory

With the MyManagedConnectionFactory class, which implements the ManagedConnectionFacytory interface, you create the MyConnectionFactory and MyManagedConnection classes. The MyManagedConnectionFactory class is the main entry point for the application server to invoke the adapter:

package org.acme.jca;
import java.io.PrintWriter;
import java.io.Serializable;
import java.sql.DriverManager;
import java.util.Iterator;
import java.util.Set;
import javax.resource.ResourceException;
import javax.resource.spi.*;
import javax.security.auth.Subject;
public class MyManagedConnectionFactory
implements ManagedConnectionFactory, Serializable
{
public MyManagedConnectionFactory() {
System.out.println("In MyManagedConnectionFactory.constructor");
}
public Object createConnectionFactory(ConnectionManager cxManager) throws ResourceException {
System.out.println("In MyManagedConnectionFactory.createConnectionFactory,1");
return new MyDataSource(this, cxManager);
}
public Object createConnectionFactory() throws ResourceException {
System.out.println("In MyManagedConnectionFactory.createManagedFactory,2");
return new MyDataSource(this, null);
}
public ManagedConnection createManagedConnection(Subject subject, ConnectionRequestInfo info) {
System.out.println("In MyManagedConnectionFactory.createManagedConnection");
return new MyManagedConnection(this, "test");
}
public ManagedConnection matchManagedConnections(Set connectionSet, Subject subject, ConnectionRequestInfo info)
throws ResourceException
{
System.out.println("In MyManagedConnectionFactory.matchManagedConnections");
return null;
}
public void setLogWriter(PrintWriter out) throws ResourceException {
System.out.println("In MyManagedConnectionFactory.setLogWriter");
}
public PrintWriter getLogWriter() throws ResourceException {
System.out.println("In MyManagedConnectionFactory.getLogWriter");
return DriverManager.getLogWriter();
}
public boolean equals(Object obj) {
if(obj == null)
return false;
if(obj instanceof MyManagedConnectionFactory)
{
int hash1 = ((MyManagedConnectionFactory)obj).hashCode();
int hash2 = hashCode();
return hash1 == hash2;
}
else
{
return false;
}
}
public int hashCode()
{
return 1;
}
}

MyManagedConnection

The MyManagedConnection class implements the ManagedConnection interface. MyManagedConnection encapsulates the adapter's physical connection, in this case the MyConnection class:

package org.acme.jca;
import java.io.PrintWriter;
import java.sql.Connection;
import java.sql.SQLException;
import java.util.*;
import javax.resource.NotSupportedException;
import javax.resource.ResourceException;
import javax.resource.spi.*;
import javax.security.auth.Subject;
import javax.transaction.xa.XAResource;
public class MyManagedConnection
implements ManagedConnection
{
private MyConnectionEventListener myListener;
private String user;
private ManagedConnectionFactory mcf;
private PrintWriter logWriter;
private boolean destroyed;
private Set connectionSet;
MyManagedConnection(ManagedConnectionFactory mcf, String user)
{
System.out.println("In MyManagedConnection");
this.mcf = mcf;
this.user = user;
connectionSet = new HashSet();
myListener = new MyConnectionEventListener(this);
}
private void throwResourceException(SQLException ex)
throws ResourceException
{
ResourceException re = new ResourceException("SQLException: " +
ex.getMessage());
re.setLinkedException(ex);
throw re;
}
public Object getConnection(Subject subject, ConnectionRequestInfo
connectionRequestInfo)
throws ResourceException
{
System.out.println("In MyManagedConnection.getConnection");
MyConnection myCon = new MyConnection(this);
addMyConnection(myCon);
return myCon;
}
public void destroy()
{
System.out.println("In MyManagedConnection.destroy");
destroyed = true;
}
public void cleanup()
{
System.out.println("In MyManagedConnection.cleanup");
}
public void associateConnection(Object connection)
{
System.out.println("In MyManagedConnection.associateConnection");
}
public void addConnectionEventListener(ConnectionEventListener listener)
{
System.out.println("In MyManagedConnection.addConnectionEventListener");
myListener.addConnectorListener(listener);
}
public void removeConnectionEventListener(ConnectionEventListener listener)
{
System.out.println("In MyManagedConnection.removeConnectionEventListener");
myListener.removeConnectorListener(listener);
}
public XAResource getXAResource()
throws ResourceException
{
System.out.println("In MyManagedConnection.getXAResource");
return null;
}
public LocalTransaction getLocalTransaction()
{
System.out.println("In MyManagedConnection.getLocalTransaction");
return null;
}
public ManagedConnectionMetaData getMetaData()
throws ResourceException
{
System.out.println("In MyManagedConnection.getMetaData");
return new MyConnectionMetaData(this);
}
public void setLogWriter(PrintWriter out)
throws ResourceException
{
System.out.println("In MyManagedConnection.setLogWriter");
logWriter = out;
}
public PrintWriter getLogWriter()
throws ResourceException
{
System.out.println("In MyManagedConnection.getLogWriter");
return logWriter;
}
Connection getMyConnection()
throws ResourceException
{
System.out.println("In MyManagedConnection.getMyConnection");
return null;
}
boolean isDestroyed()
{
System.out.println("In MyManagedConnection.isDestroyed");
return destroyed;
}
String getUserName()
{
System.out.println("In MyManagedConnection.getUserName");
return user;
}
void sendEvent(int eventType, Exception ex)
{
System.out.println("In MyManagedConnection.sendEvent,1");
myListener.sendEvent(eventType, ex, null);
}
void sendEvent(int eventType, Exception ex, Object connectionHandle)
{
System.out.println("In MyManagedConnection.sendEvent,2 ");
myListener.sendEvent(eventType, ex, connectionHandle);
}
void removeMyConnection(MyConnection myCon)
{
System.out.println("In MyManagedConnection.removeMyConnection");
connectionSet.remove(myCon);
}
void addMyConnection(MyConnection myCon)
{
System.out.println("In MyManagedConnection.addMyConnection");
connectionSet.add(myCon);
}
ManagedConnectionFactory getManagedConnectionFactory()
{
System.out.println("In MyManagedConnection.getManagedConnectionFactory");
return mcf;
}
}

MyConnectionEventListener

For its part, the MyConnectionEventListener class allows the application server to register callbacks for the adapter. The application server can then perform operations, connection-pool maintenance, for example, based on the connection state:

package org.acme.jca;
import java.util.Vector;
import javax.resource.spi.ConnectionEvent;
import javax.resource.spi.ConnectionEventListener;
import javax.resource.spi.ManagedConnection;
public class MyConnectionEventListener
implements javax.sql.ConnectionEventListener
{
private Vector listeners;
private ManagedConnection mcon;
public MyConnectionEventListener(ManagedConnection mcon)
{
System.out.println("In MyConnectionEventListener");
this.mcon = mcon;
}
public void sendEvent(int eventType, Exception ex, Object connectionHandle)
{
System.out.println("In MyConnectionEventListener.sendEvent");
}
public void addConnectorListener(ConnectionEventListener l)
{
System.out.println("In MyConnectionEventListener.addConnectorListener");
}
public void removeConnectorListener(ConnectionEventListener l)
{
System.out.println("In MyConnectionEventListener.removeConnectorListener");
}
public void connectionClosed(javax.sql.ConnectionEvent connectionevent)
{
System.out.println("In MyConnectionEventListener.connectorClosed");
}
public void connectionErrorOccurred(javax.sql.ConnectionEvent event)
{
System.out.println("In MyConnectionEventListener.connectorErrorOccurred");
}
}

MyConnectionMetaData

The MyConnectionMetaData class provides meta information -- product name, the maximum number of connections allowed, and so on -- regarding the managed connection and the underlying physical connection class:

package org.acme.jca;
import javax.resource.ResourceException;
import javax.resource.spi.*;
public class MyConnectionMetaData
implements ManagedConnectionMetaData
{
private MyManagedConnection mc;
public MyConnectionMetaData(MyManagedConnection mc)
{
System.out.println("In MyConnectionMetaData.constructor");
this.mc = mc;
}
public String getEISProductName()
throws ResourceException
{
System.out.println("In MyConnectionMetaData.getEISProductName");
return "myJCA";
}
public String getEISProductVersion()
throws ResourceException
{
System.out.println("In MyConnectionMetaData.getEISProductVersion");
return "1.0";
}
public int getMaxConnections()
throws ResourceException
{
System.out.println("In MyConnectionMetaData.getMaxConnections");
return 5;
}
public String getUserName()
throws ResourceException
{
return mc.getUserName();
}
}

MyConnection

The MyConnection class, which represents the underlying physical connection to the EIS. MyConnection is one of the few classes that does not implement an interface in the JCA specification. The implementation below is simplistic, but a working implementation might contain connectivity code using sockets, as well as other functionality:

package org.acme.jca;
public class MyConnection
{
private MyManagedConnection mc;
public MyConnection(MyManagedConnection mc)
{
System.out.println("In MyConnection");
this.mc = mc;
}
}

MyConnectionRequestInfo

The MyConnectionRequestInfo class contains the data (such as the user name, password, and other information) necessary to establish a connection:

package org.acme.jca;
import javax.resource.spi.ConnectionRequestInfo;
public class MyConnectionRequestInfo
implements ConnectionRequestInfo
{
private String user;
private String password;
public MyConnectionRequestInfo(String user, String password)
{
System.out.println("In MyConnectionRequestInfo");
this.user = user;
this.password = password;
}
public String getUser()
{
System.out.println("In MyConnectionRequestInfo.getUser");
return user;
}
public String getPassword()
{
System.out.println("In MyConnectionRequestInfo.getPassword");
return password;
}
public boolean equals(Object obj)
{
System.out.println("In MyConnectionRequestInfo.equals");
if(obj == null)
return false;
if(obj instanceof MyConnectionRequestInfo)
{
MyConnectionRequestInfo other = (MyConnectionRequestInfo)obj;
return isEqual(user, other.user) && isEqual(password, other.password);
} else
{
return false;
}
}
public int hashCode()
{
System.out.println("In MyConnectionRequestInfo.hashCode");
String result = "" + user + password;
return result.hashCode();
}
private boolean isEqual(Object o1, Object o2)
{
System.out.println("In MyConnectionRequestInfo.isEqual");
if(o1 == null)
return o2 == null;
else
return o1.equals(o2);
}
}

MyDataSource

The MyDataSource class serves as a connection factory for the underlying connections. Because the sample adapter does not implement the CCI interfaces, it implements the DataSource interface in the javax.sql package:

package org.acme.jca;
import java.io.PrintWriter;
import java.io.Serializable;
import java.sql.*;
import javax.naming.Reference;
import javax.resource.Referenceable;
import javax.resource.ResourceException;
import javax.resource.spi.ConnectionManager;
import javax.resource.spi.ManagedConnectionFactory;
import javax.sql.DataSource;
public class MyDataSource
implements DataSource, Serializable, Referenceable
{
private String desc;
private ManagedConnectionFactory mcf;
private ConnectionManager cm;
private Reference reference;
public MyDataSource(ManagedConnectionFactory mcf, ConnectionManager cm)
{
System.out.println("In MyDataSource");
this.mcf = mcf;
if(cm == null)
this.cm = new MyConnectionManager();
else
this.cm = cm;
}
public Connection getConnection()
throws SQLException
{
System.out.println("In MyDataSource.getConnection,1");
try
{
return (Connection)cm.allocateConnection(mcf, null);
}
catch(ResourceException ex)
{
throw new SQLException(ex.getMessage());
}
}
public Connection getConnection(String username, String password)
throws SQLException
{
System.out.println("In MyDataSource.getConnection,2");
try
{
javax.resource.spi.ConnectionRequestInfo info = new MyConnectionRequestInfo(username, password);
return (Connection)cm.allocateConnection(mcf, info);
}
catch(ResourceException ex)
{
throw new SQLException(ex.getMessage());
}
}
public int getLoginTimeout()
throws SQLException
{
return DriverManager.getLoginTimeout();
}
public void setLoginTimeout(int seconds)
throws SQLException
{
DriverManager.setLoginTimeout(seconds);
}
public PrintWriter getLogWriter()
throws SQLException
{
return DriverManager.getLogWriter();
}
public void setLogWriter(PrintWriter out)
throws SQLException
{
DriverManager.setLogWriter(out);
}
public String getDescription()
{
return desc;
}
public void setDescription(String desc)
{
this.desc = desc;
}
public void setReference(Reference reference)
{
this.reference = reference;
}
public Reference getReference()
{
return reference;
}
}

Now compile and build testjca.rar

Now that you've seen the adapter' source code, it's time to build the testjca.rar file. First, I assume you have a source directory containing two subdirectories: testjca containing the .java files, and META-INF containing the configuration files.

To compile and build the rar file:

1. Compile the class files by typing javac *.java in the testjca directory
2. Build the testjca.jar from the source directory by entering jar cvf testjca.jar myjca
3. Create the rar file using the testjca.jar and the META-INF directory by typing jar cvf testjca.rar myjca.jar META-INF

Deployment output

Once you deploy the adapter rar file, you should see the output of the println statements contained in most of the adapter's methods. You should see output similar to the following as the adapter deploys:

In MyManagedConnectionFactory.constructor
In MyManagedConnectionFactory.createManagedConnection
In MyManagedConnection
In MyConnectionEventListener
In MyManagedConnection.getMetaData
In MyConnectionMetaData.constructor
In MyConnectionMetaData.getEISProductName
In MyConnectionMetaData.getEISProductVersion
In MyConnectionMetaData.getMaxConnections

The output above shows the ManagedConnectionFactory's creation, which then invoked the ManagedConnection, which in turn created the ConnectionEventListener. Finally, you see that the application server called the ConnectionMetaData.
Get a connection

Now that you've deployed the adapter successfully, let's use the adapter to obtain a connection. The following JSP (JavaServer Pages) file does just that, by looking up the connection using JNDI (Java Naming and Directory Interface), then calling the getConnection() method on the DataSource:


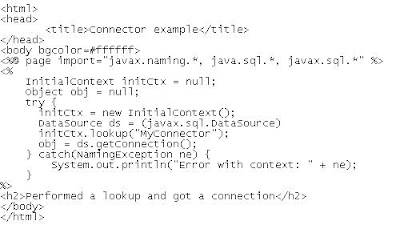
You'll see the following output when the adapter acquires the connection:

In MyManagedConnectionFactory.createConnectionFactory,1
In MyDataSource
In MyDataSource.getConnection,1
In MyManagedConnectionFactory.matchManagedConnections
In MyManagedConnectionFactory.createManagedConnection
In MyManagedConnection
In MyConnectionEventListener
In MyManagedConnection.getMetaData
In MyConnectionMetaData.constructor
In MyConnectionMetaData.getEISProductName
In MyConnectionMetaData.getEISProductVersion
In MyConnectionMetaData.getMaxConnections
In MyManagedConnection.getUserName
In MyManagedConnection.getConnection
In MyConnection
In MyManagedConnection.addMyConnection
In MyManagedConnection.addConnectionEventListener


If you are able to see the mentioned output, now you are ready to build your own connector.

Sunday, July 18, 2010

1.1 For SSL Communication Support (Integrating WebLogic Server with TIBCO EMS)

Note : Presuming we have integrated WebLogic Server with TIBCO EMS as described in the previous post.

Now as we have already configured MDB deployed on WebLogic Server to listen to JMS destination (in our example we configured Queue, it can be configured for Topic also in the same way), we will modify a bit to add SSL support. It can be done by following the simple steps:

Add the SSL JAR Files and New JNDI Properties File to the CLASSPATH

Add SSL JAR Files and New JNDI Properties File to the WebLogic Server CLASSPATH, by adding the following lines in front of the CLASSPATH variable value in startup script.

C:\tibco\ems\clients\java\jcert.jar;C:\tibco\ems\clients\java\jnet.jar;C:\tibco\ems\clients\java\jsse.jar;C:\tibco\ems\clients\java\tibcrypt.jar;C:\tibco\EMS\clients\java;

Create a new file named jndi.properties, add the following lines and save it to the directory C:\tibco\EMS\clients\java.

com.tibco.tibjms.naming.security_protocol=ssl
com.tibco.tibjms.naming.ssl_enable_verify_host=false

These properties specify that the "SSL" protocol should be used for JNDI lookups and that host verification is turned off (the client will trust any host). JNDI reads this file automatically and adds the properties to the environment of the initial JNDI context.

Configure the TIBCO Enterprise Message Service Server for SSL

In C:\tibco\EMS\bin\tibemsd.conf, add the following lines:

listen = ssl://localhost:7243
ssl_server_identity = certs/server.cert.pem
ssl_server_key = certs/server.key.pem
ssl_password = password
listen = tcp://localhost:7222

These lines explicitly set the tcp and ssl listen ports and specify the three required server-side SSL parameters identity, private key, and password.

Save the file, then stop and restart the TIBCO Enterprise Message Service server. When the server restarts, you should see messages like the following in the console window confirming SSL is enabled:

2010-07-18 10:00:05 Secure Socket Layer is enabled, using openSSL
2010-07-18 10:00:05 Accepting connections on ssl://:7243.
2010-07-18 10:00:05 Accepting connections on tcp://:7222.

Now modify the foreign JMSConnectionFactory in WebLogic to point to an SSLConnectionFactory

Open TIBCO_JMSServer properties from Services > Messaging > JMS Modules > MySystemModule > TIBCO_JMSServer of WebLogic Administration consoles and change the "JNDI Connection URL" to "tibjmsnaming://localhost:7243"

Modify the Example Client Program for SSL-Based Communication

In the "MyClient.java", change the value for "PROVIDER_URL" to "tibjmsnaming://localhost:7243"

We are now done with the modification for SSL support. To show that SSL communications are in fact occurring, you could remove the SSL settings you added to tibemsd.conf. Then restart the TIBCO Enterprise Message Service server and the WebLogic Server. If you check the WebLogic Server logs, you should see exceptions thrown indicating that it could not connect. If you now run the "MyClient.java" again, you should see that it throws an exception indicating that it could not connect to the server using the SSL protocol. Alternatively (or additionally), you could start the TIBCO Enterprise Message Service server from a command prompt window and turn SSL debug tracing on, as follows:

>tibemsd -ssl_debug_trace

Then, if you re-start WebLogic Server and re-run the test program, you will see SSL debugging output on the tibemsd console window.

Friday, July 9, 2010

1. Integrating WebLogic Server with TIBCO EMS

As we have been talking about integrating Application Servers and different messaging systems, lets take a tour to see how to use TIBCO Enterprise Message Service to drive a Message Driven Bean deployed in WebLogic Server.

(In case you are looking for an example MDB and client, please get it from HERE. Please compile it and create a deployable JAR).

Make the following configuration changes to the WebLogic Server and the example MDB to use TIBCO EMS instead of WLS JMS subsystem.

A> Add the TIBCO Enterprise Message Service JAR file to the CLASSPATH of WebLogic Server.

B> Create the appropriate foreign JMSConnectionFactory and foreign JMSDestination for the foreign JMS Server, TIBCO Enterprise Message Service, in WebLogic. This is necessary to allow the WebLogic server to redirect lookups of ConnectionFactory and Destinations in its JNDI to TIBCO Enterprise Message Service's JNDI.

C> Create the appropriate JMS Destination object inside the TIBCO EMS using its administration tool.

D> Modify the weblogic-ejb-jar.xml file for the MDB to use appropriate JMSConnectionFactory and JMSDestination.

E> Modify the client program to look up its administered objects from the built-in JNDI provider in TIBCO Enterprise Message Service.

A. Adding TIBCO Enterprise Message Service to the WebLogic CLASSPATH

Modify the CLASSPATH environment variable in WLS startup script by adding this path to the end of its value list:

C:\tibco\ems\clients\java\tibjms.jar (presuming you have installed TIBCO EMS in C:\tibco)

B. Creating Foreign JMSServer, JMSConnectionFactory, and JMSDestination in WebLogic

1> Start WebLogic Domain (Admin Server) and log in to Admin Console.

2> In the left pane, Create a Foreign Server under:
Services > Messaging > JMS Modules > MySystemModule > New > Foreign Server (my already created JMS Module name is "MySystemModule")

Enter TIBCO_JMSServer in the Name box, after creating, go to the Foreign Server and provide JNDI Initial Context Factory = com.tibco.tibjms.naming.TibjmsInitialContextFactory
JNDI Connection URL = tibjmsnaming://localhost:7222

Go to Connection Factories tab and create a new Connection Factory:
Name = TIBCO_JMSQueueConnectionFactory
Local JNDI Name = TIBCO.tcf
Remote JNDI Name = QueueConnectionFactory

Go to Destinations tab and create a new Destination:
Name = TIBCO_JMSQueue_quotes
Local JNDI Name = TIBCO.quotes
Remote JNDI Name = quotes

C. Creating appropriate JMS Destination object inside the TIBCO EMS

1> Start the TIBCO Enterprise Message Service server by selecting Start -> Programs -> TIBCO Enterprise Message Service -> Start JMS Server from the Windows Start menu.

2> Start the TIBCO Enterprise Message Service administration tool by selecting Start -> Programs -> TIBCO Enterprise Message Service -> Start EMS Administration Tool from the Windows Start menu.

3> Enter the following commands:
> connect
> create topic quotes

D. Modifying the weblogic-ejb-jar.xml file for MDB

To use the appropriate JMSConnectionFactory and JMSDestination modify weblogic-ejb-jar.xml as follows:

1> Replace the value for element with TIBCO.quotes.

2> Within the element and immediately after both instances of the element, add the following element:


E. Modify the Client

1. change the following:
QUEUE_NAME = "quotes";
CONNECTION_FACTORY = "QueueConnectionFactory";
PROVIDER_URL = "tibjmsnaming://localhost:7222";
java.naming.factory.initial = com.tibco.tibjms.naming.TibjmsInitialContextFactory

2. Verify that you have tibjms.jar in classpath.

Now everything is set, so deploy the MDB in WLS and test the client. If you can see your client program is sending messages and the MDB in WLS is consuming them and printing the o/p in WLS server startup prompt then we have successfully configured MDB deployed in WebLogic to listen to TIBCO EMS destination where messages are delivered by a standalone client.

Thursday, May 13, 2010

Integrating WebLogic Server with Websphere MQ

Most of the production system configuration relies on messaging now-a-days and which requires compatibilities and interconnection between different middleware servers and messaging system e.g. WebLogic and WebSphere MQ JMS.

In the following steps I tried to make it simple and clear. Depending on the business need it can be re-scaled or re-architect.

Links might help:
1> WebSphere MQ System Requirement
2> WebLogic System Requirement (I will be using WLS8.1 SP4 instance on Windows)

Creating WebSphere MQ queue manager and configuring JMS JNDI namespace

To work with this example, you need to have a QueueConnectionFactory and Queue objects created in JNDI namespace to connect to the queue manager and access queues. Use the following commands to create a queue manager and queues in WebSphere MQ:

1. Create the queue manager: crtmqm testqmgr.
2. Start the queue manager: strmqm testqmgr.
3. Create queues in the queue manager:

runmqsc testqmgr
DEFINE QLOCAL("MyMDBQueue")
DEFINE QLOCAL("MyReplyQueue")
end

Next, create a simple file-based JNDI context and configure the JMS objects in that JNDI namespace. These JNDI objects are used by applications running in WebSphere Application Server Community Edition to connect to the WebSphere MQ queue manager. For this exercise, WebLogic and WebSphere MQ should be on the same machine.

The setting is for file-based JNDI. Create the directory C:\JNDI-Directory before continuing with the next step. Create MyAdmin.config with the following contents:

INITIAL_CONTEXT_FACTORY=com.sun.jndi.fscontext.RefFSContextFactory
PROVIDER_URL=file:/C:/JNDI-Directory
SECURITY_AUTHENTICATION=none

Next, create the QueueConnectionFactory and Queue objects by executing the command:

C:\Program Files\IBM\WebSphere MQ\Java\bin\JMSAdmin.bat -cfg MyAdmin.config

You should see this prompt, where you can configure the JNDI objects: InitCtx>

At the prompt, type the following commands and press Enter after each one:

def xaqcf(ReceiverQCF) qmgr(testqmgr)
def xaqcf(SenderQCF) qmgr(testqmgr)
def q(MyMDBQueue) qmgr(testqmgr) queue(MyMDBQueue)
def q(MyReplyQueue) qmgr(testqmgr) queue(MyReplyQueue)
end

The above configurations are basic steps. For more information about the JMSAdmin tool, CLICK HERE (search for "Using the WebSphere MQ JMS administration tool")

Creating a WebLogic server instance

Create a WebLogic server instance, then add the WebSphere MQ JMS JAR files to its classpath and do the configuration steps below:

1. Install WebLogic Server, for example in C:\bea.
2. Open a command window (cmd.exe).
3. Execute C:\bea\weblogic81\server\bin\setWLSEnv.cmd.
4. Create the server by using the wizard: Click
Start => All Programs => BEA WebLogic Platform 8.1 => Configuration Wizard

Or you can use the following command:
1. Create a directory where you want to run the test, such as C:\jms\WebLogic\test\server, and make it your current directory.
2. Execute the following command to create the domain and server:

java -Dweblogic.Domain=MQJMSTEST -Dweblogic.Name=MQJMSTESTSERVER
-Dweblogic.management.username=weblogic -Dweblogic.management.password=weblogic
-Dweblogic.management.GenerateDefaultConfig=true weblogic.Server

5. After the above command has completed, stop the server, open another command window, and call C:\bea\weblogic81\server\bin\setWLSEnv.cmd by executing the following command:

java weblogic.Admin -url t3://localhost:7001 -username weblogic
-password weblogic FORCESHUTDOWN

6. Configure the WebLogic Server classpath to access the WebSphere MQ JMS JAR files by editing C:\jms\WebLogic\test\server\startMQJMSTEST.cmd and adding the following line just before the last command to start the server JVM:

set MQ_JAVA=C:\Program Files\IBM\WebSphere MQ\Java\lib
set CLASSPATH=%MQ_JAVA%\com.ibm.mq.jar;%CLASSPATH%
set CLASSPATH=%MQ_JAVA%\com.ibm.mqjms.jar;%CLASSPATH%;
set CLASSPATH=%MQ_JAVA%\com.ibm.mqetclient.jar;%CLASSPATH%
(Above line is applicable only for WebSphere MQ + Extended Transactional Client)
set CLASSPATH=%MQ_JAVA%\fscontext.jar;%CLASSPATH%
set PATH=%MQ_JAVA%;%PATH%

7. Start the server by executing C:\jms\WebLogic\test\server\startMQJMSTEST.cmd.

WebLogic Server should be running. Access its admin console using http://localhost:7001/console and authenticating with user name and password (in this example we used weblogic for both).

Configuring a WebLogic foreign JMS server

Next, configure the WebLogic foreign JMS provider with the JNDI setting to access it.

Access http://localhost:7001/console, authenticating with the user name and password used in creating the WebLogic server instance above. After login, navigate to MQJMSTEST => Services => JMS => Foreign JMS Servers. In the right pane, click Configure a new Foreign JMSServer and enter the following values:

* Name: MQJMSTEST Foreign JMS Server
* JNDI Initial Context Factory: com.sun.jndi.fscontext.RefFSContextFactory
* JNDI Connection URL: file:/C:/JNDI-Directory

The screen should look like this:


Figure 1. Creating new Foreign JMS Server.

Click Create at right bottom. You will get another screen to choose the instance of WebLogic Server where this foreign JMS server needs to be created. Select MQJMSTESTSERVER and click Apply.

Now you are ready to configure the QueueConnectionFactory and Queue objects in the newly created foreign JMS provider. By this step what we will be doing is that referring the QueueConnectionFactory and Queues defined in the file-based JNDI as a foreign JMS provider.

Creating QueueConnectionFactory objects in a foreign JMS provider

Navigate to MQJMSTEST => Services => JMS => Foreign JMS Servers => MQJMSTEST Foreign JMS Server => Foreign JMS Connection Factories. In the right pane, click Configure a new Foreign JMSConnection Factory and enter the following values:

* Name: WLSenderQCF
* Local JNDI Name: jms/WLSenderQCF
* Remote JNDI Name: SenderQCF

The remote JNDI Name should match the QueueConnectionFactory name created in the file-based JNDI using the JMSAdmin tool. The screen should look like this:


Figure 2. Creating QueueConnectionFactory.

Click Create at right bottom to complete this operation.

Creating destination objects in the foreign JMS provider

To create the destinations, navigate to MQJMSTEST => Services => JMS => Foreign JMS Servers => MQJMSTEST Foreign JMS Server => Foreign JMS Destinations. In the right pane, click Configure a new foreign JMSDestination and enter the following values:

* Name: WLMyReplyQueue
* Local JNDI Name: jms/WLMyReplyQueue
* Remote JNDI Name: MyReplyQueue

The remote JNDI Name should match the destinations created in the file-based JNDI using the JMSAdmin tool. The screen should look like this:


Figure 3. Creating Queue Destination.
Creating Queue Destination

Click Create at right bottom to complete the operation. Now you are ready with foreign JMS configurations to look into the MDB application.

Developing a sample application and deploying it on WebLogic

Here we use an MDB that is listening for the messages from MyMDBQueue in Queue manager testqmgr. The onMessage() picks up the messages and forwards the same message to MyReplyQueue by calling the putMessage(javax.jms.Message msg) method.

A sample application can be downloaded from HERE

1. Open a command prompt and execute the following commands:

2. cd C:\wlresources

3. C:\bea\weblogic81\server\bin\setWLSEnv.cmd

4. javac com\ibm\WLSampleMDB\SampleMDBBean.java

5. jar -cvf WLSampleMDB.jar com META-INF (creates WLSampleMDB.jar, on which you will work further to deploy it on the server ).

6. Start the Application Builder: Click Start => All Programs => BEA WebLogic Platform 8.1 => Other Development Tools => WebLogic Builder.

7. In WebLogic Builder, click File =>Open and select the WLSampleMDB.jar created in Step 5 (if prompted, click Yes for creating the Deployment Descriptors).

8. Click SampleMDBBean on the left-side tree view, select the General tab, and change the following values:

* JNDI Name: SampleMDBBean
* Transaction Timeout: 300
* Destination Type: javax.jms.Queue
* Destination JNDI: MyMDBQueue (This is the name you have given when you created a queue using JMSAdmin tool)

9. Select the Foreign JMS Provider tab, select Use Foreign JMS Provider, and enter the following values:

* Provider URL: file:/C:/JNDI-Directory
* Connection Factory JNDI Name: ReceiverQCF (The Connection Factory name we created using the JMSAdmin tool for the MDB to receive the messages)
* Initial Context Factory: com.sun.jndi.fscontext.RefFSContextFactory

10. Select the Advanced tab and ensure that for Transaction Type, the value Container is selected.

11. From the left-side tree view, under SampleMDBBean, select Methods and ensure that Default transaction is selected as required.

12. From the left-side tree view, under SampleMDBBean, select Resources.

13. Select the Resource Reference tab from the right-side pane and click Add (if the resources are already defined, click Edit). Enter the following values:

* Resource reference Name: WLSenderQCF
* Resource Type: javax.jms.QueueConnectionFactory
* Resource Authority: Application
* JNDI Name: jms/WLSenderQCF
* Sharing Scope: Unsharable

14. Click OK. Similarly add another resource reference with following values:

* Resource reference Name: MyReplyQueue
* Resource Type: javax.jms.Queue
* Resource Authority: Application
* JNDI Name: jms/MyReplyQueue
* Sharing Scope: Unsharable

15. Click File => Save to save Save WLSampleMDB.jar.

16. To deploy this assembled JAR file, click Tools => Deploy Module. If you are asked for the configuration values to connect to WebLogic Server, verify that they match the values below:

* Protocol: t3
* Host: localhost
* Port: 7001
* Server Name: MQJMSTESTSERVER
* System User Name: weblogic
* System User Password: weblogic
* Now click Connect and in next pop-up window, click Deploy Module.

17. Test the application using the command amqsput MyMDBQueue testqmgr from the command prompt and type any text you want to put it as a message, now observe the console where the WebLogic Server is running and you should be able to see something like this:

Message Received:
JMS Message class: jms_text
JMSType: null
JMSDeliveryMode: 1
JMSExpiration: 0
JMSPriority: 0
JMSMessageID: ID:414d512074657374716d6772202020203f40254420000908
JMSTimestamp: 1143559825190
JMSCorrelationID:null
JMSDestination: null
JMSReplyTo: null
JMSRedelivered: false
JMS_IBM_PutDate:20060328
JMSXAppID:WebSphere MQ\bin\amqsput.exe
JMS_IBM_Format:MQSTR
JMS_IBM_PutApplType:11
JMS_IBM_MsgType:8
JMSXUserID:sanjay
JMS_IBM_PutTime:15302519
JMSXDeliveryCount:1
This is a Test Message

putting the message to MyReplyQueue
looked up QueueConnectionFactory: weblogic.deployment.jms.PooledConnectionFactory@8710bd
looked up Queue: queue://testqmgr/MyReplyQueue
Message send

If you see the above mentioned line properly, then we have configured WebLogic Server and WebSphere MQ to connect to each other and used an MDB sample to get a message and forward it to another queue within a global transaction.

Monday, January 18, 2010

Java HotSpot VM Options

VM options categorized in two types:
  1. Standard options
  2. Non-standard options

For Standard Options please refer the follwoing links depending on your plateform

Windows: http://java.sun.com/j2se/1.5.0/docs/tooldocs/windows/java.html

Solaris: http://java.sun.com/j2se/1.5.0/docs/tooldocs/solaris/java.html

Linux: http://java.sun.com/j2se/1.5.0/docs/tooldocs/linux/java.html

Non-standard options are further categorized in two:

  • Options that begin with -X are non-standard (not guaranteed to be supported on all VM implementations), and are subject to change without notice in subsequent releases of the JDK.
  • Options that are specified with -XX are not stable and are not recommended for casual use. These options are subject to change without notice.

Note: For -X options, please refer the links mentioned above.

Some Useful -XX Options

  • Boolean options are turned on with -XX:+ and turned off with -XX:-.
  • Numeric options are set with -XX:=. Numbers can include 'm' or 'M' for megabytes, 'k' or 'K' for kilobytes, and 'g' or 'G' for gigabytes (for example, 32k is the same as 32768).
  • String options are set with -XX:=, are usually used to specify a file, a path, or a list of commands

Flags marked as manageable are dynamically writeable through the JDK management interface (com.sun.management.HotSpotDiagnosticMXBean API) and also through JConsole.

Behavioral Options

Option and Default Value

Description

-XX:-AllowUserSignalHandlers

Do not complain if the application installs signal handlers. (Relevant to Solaris and Linux only.)

-XX:AltStackSize=16384

Alternate signal stack size (in Kbytes). (Relevant to Solaris only, removed from 5.0.)

-XX:-DisableExplicitGC

Disable calls to System.gc(), JVM still performs garbage collection when necessary.

-XX:+FailOverToOldVerifier

Fail over to old verifier when the new type checker fails. (Introduced in 6.)

-XX:+HandlePromotionFailure

The youngest generation collection does not require a guarantee of full promotion of all live objects. (Introduced in 1.4.2 update 11) [5.0 and earlier: false.]

-XX:+MaxFDLimit

Bump the number of file descriptors to max. (Relevant to Solaris only.)

-XX:PreBlockSpin=10

Spin count variable for use with -XX:+UseSpinning. Controls the maximum spin iterations allowed before entering operating system thread synchronization code. (Introduced in 1.4.2.)

-XX:-RelaxAccessControlCheck

Relax the access control checks in the verifier. (Introduced in 6.)

-XX:+ScavengeBeforeFullGC

Do young generation GC prior to a full GC. (Introduced in 1.4.1.)

-XX:+UseAltSigs

Use alternate signals instead of SIGUSR1 and SIGUSR2 for VM internal signals. (Introduced in 1.3.1 update 9, 1.4.1. Relevant to Solaris only.)

-XX:+UseBoundThreads

Bind user level threads to kernel threads. (Relevant to Solaris only.)

-XX:-UseConcMarkSweepGC

Use concurrent mark-sweep collection for the old generation. (Introduced in 1.4.1)

-XX:+UseGCOverheadLimit

Use a policy that limits the proportion of the VM's time that is spent in GC before an OutOfMemory error is thrown. (Introduced in 6.)

-XX:+UseLWPSynchronization

Use LWP-based instead of thread based synchronization. (Introduced in 1.4.0. Relevant to Solaris only.)

-XX:-UseParallelGC

Use parallel garbage collection for scavenges. (Introduced in 1.4.1)

-XX:-UseParallelOldGC

Use parallel garbage collection for the full collections. Enabling this option automatically sets -XX:+UseParallelGC. (Introduced in 5.0 update 6.)

-XX:-UseSerialGC

Use serial garbage collection. (Introduced in 5.0.)

-XX:-UseSpinning

Enable naive spinning on Java monitor before entering operating system thread synchronizaton code. (Relevant to 1.4.2 and 5.0 only.) [1.4.2, multi-processor Windows platforms: true]

-XX:+UseTLAB

Use thread-local object allocation (Introduced in 1.4.0, known as UseTLE prior to that.) [1.4.2 and earlier, x86 or with -client: false]

-XX:+UseSplitVerifier

Use the new type checker with StackMapTable attributes. (Introduced in 5.0.)[5.0: false]

-XX:+UseThreadPriorities

Use native thread priorities.

-XX:+UseVMInterruptibleIO

Thread interrupt before or with EINTR for I/O operations results in OS_INTRPT. (Introduced in 6. Relevant to Solaris only.)

Performance Options

Option and Default Value

Description

-XX:+AggressiveOpts

Turn on point performance compiler optimizations that are expected to be default in upcoming releases. (Introduced in 5.0 update 6.)

-XX:CompileThreshold=10000

Number of method invocations/branches before compiling [-client: 1,500]

-XX:LargePageSizeInBytes=4m

Sets the large page size used for the Java heap. (Introduced in 1.4.0 update 1.) [amd64: 2m.]

-XX:MaxHeapFreeRatio=70

Maximum percentage of heap free after GC to avoid shrinking.

-XX:MaxNewSize=size

Maximum size of new generation (in bytes). Since 1.4, MaxNewSize is computed as a function of NewRatio. [1.3.1 Sparc: 32m; 1.3.1 x86: 2.5m.]

-XX:MaxPermSize=64m

Size of the Permanent Generation. [5.0 and newer: 64 bit VMs are scaled 30% larger; 1.4 amd64: 96m; 1.3.1 -client: 32m.]

-XX:MinHeapFreeRatio=40

Minimum percentage of heap free after GC to avoid expansion.

-XX:NewRatio=2

Ratio of new/old generation sizes. [Sparc -client: 8; x86 -server: 8; x86 -client: 12.]-client: 4 (1.3) 8 (1.3.1+), x86: 12]

-XX:NewSize=2.125m

Default size of new generation (in bytes) [5.0 and newer: 64 bit VMs are scaled 30% larger; x86: 1m; x86, 5.0 and older: 640k]

-XX:ReservedCodeCacheSize=32m

Reserved code cache size (in bytes) - maximum code cache size. [Solaris 64-bit, amd64, and -server x86: 48m; in 1.5.0_06 and earlier, Solaris 64-bit and and64: 1024m.]

-XX:SurvivorRatio=8

Ratio of eden/survivor space size [Solaris amd64: 6; Sparc in 1.3.1: 25; other Solaris platforms in 5.0 and earlier: 32]

-XX:TargetSurvivorRatio=50

Desired percentage of survivor space used after scavenge.

-XX:ThreadStackSize=512

Thread Stack Size (in Kbytes). (0 means use default stack size) [Sparc: 512; Solaris x86: 320 (was 256 prior in 5.0 and earlier); Sparc 64 bit: 1024; Linux amd64: 1024 (was 0 in 5.0 and earlier); all others 0.]

-XX:+UseBiasedLocking

Enable biased locking.

-XX:+UseFastAccessorMethods

Use optimized versions of GetField.

-XX:-UseISM

Use Intimate Shared Memory. [Not accepted for non-Solaris platforms.]

-XX:+UseLargePages

Use large page memory. (Introduced in 5.0 update 5.)

-XX:+UseMPSS

Use Multiple Page Size Support w/4mb pages for the heap. Do not use with ISM as this replaces the need for ISM. (Introduced in 1.4.0 update 1, Relevant to Solaris 9 and newer.) [1.4.1 and earlier: false]

-XX:+StringCache

Enables caching of commonly allocated strings.

-XX:AllocatePrefetchLines=1

Number of cache lines to load after the last object allocation using prefetch instructions generated in JIT compiled code. Default values are 1 if the last allocated object was an instance and 3 if it was an array.

-XX:AllocatePrefetchStyle=1

Generated code style for prefetch instructions.
0 - no prefetch instructions are generate*d*,
1 - execute prefetch instructions after each allocation,
2 - use TLAB allocation watermark pointer to gate when prefetch instructions are executed.

Debugging Options

Option and Default Value

Description

-XX:-CITime

Prints time spent in JIT Compiler. (Introduced in 1.4.0.)

-XX:ErrorFile=./hs_err_pid.log

If an error occurs, save the error data to this file. (Introduced in 6.)

-XX:-ExtendedDTraceProbes

Enable performance-impacting dtrace probes. (Introduced in 6. Relevant to Solaris only.)

-XX:HeapDumpPath=./java_pid.hprof

Path to directory or filename for heap dump. Manageable. (Introduced in 1.4.2 update 12, 5.0 update 7.)

-XX:-HeapDumpOnOutOfMemoryError

Dump heap to file when java.lang.OutOfMemoryError is thrown. Manageable. (Introduced in 1.4.2 update 12, 5.0 update 7.)

-XX:OnError=";"

Run user-defined commands on fatal error. (Introduced in 1.4.2 update 9.)

-XX:OnOutOfMemoryError=";
"

Run user-defined commands when an OutOfMemoryError is first thrown. (Introduced in 1.4.2 update 12, 6)

-XX:-PrintClassHistogram

Print a histogram of class instances on Ctrl-Break. Manageable. (Introduced in 1.4.2.) The jmap -histo command provides equivalent functionality.

-XX:-PrintConcurrentLocks

Print java.util.concurrent locks in Ctrl-Break thread dump. Manageable. (Introduced in 6.) The jstack -l command provides equivalent functionality.

-XX:-PrintCommandLineFlags

Print flags that appeared on the command line. (Introduced in 5.0.)

-XX:-PrintCompilation

Print message when a method is compiled.

-XX:-PrintGC

Print messages at garbage collection. Manageable.

-XX:-PrintGCDetails

Print more details at garbage collection. Manageable. (Introduced in 1.4.0.)

-XX:-PrintGCTimeStamps

Print timestamps at garbage collection. Manageable (Introduced in 1.4.0.)

-XX:-PrintTenuringDistribution

Print tenuring age information.

-XX:-TraceClassLoading

Trace loading of classes.

-XX:-TraceClassLoadingPreorder

Trace all classes loaded in order referenced (not loaded). (Introduced in 1.4.2.)

-XX:-TraceClassResolution

Trace constant pool resolutions. (Introduced in 1.4.2.)

-XX:-TraceClassUnloading

Trace unloading of classes.

-XX:-TraceLoaderConstraints

Trace recording of loader constraints. (Introduced in 6.)

-XX:+PerfSaveDataToFile

Saves jvmstat binary data on exit.


Friday, January 1, 2010

How to Use Log4j with WebLogic Logging Services

WebLogic logging services use an implementation based on the Java Logging APIs, by default. Using the LogMBean.isLog4jLoggingEnabled attribute, you can direct the logging services to use Log4j instead.

In the Administration Console, you can specify Log4j or keep the default Java Logging implementation.

Alternatively, you can configure Log4j logging through the LogMBean interface and by adding WebLogic-specific Log4j classes, WL_HOME/server/lib/wllog4j.jar, and the log4j.jar file to the server CLASSPATH. The recommended way to do this is to place the wllog4j.jar and log4j.jar files in the DOMAIN_NAME/lib directory; there, they will get added to the server CLASSPATH dynamically during server startup.

Note: WebLogic Server does not provide a Log4j version in its distribution.

When Log4j is enabled, you get a reference to the org.apache.log4j.Logger that the server is using from the weblogic.logging.log4j.Log4jLoggingHelper class.

With a Log4j Logger reference, you can attach you own custom appender to receive the server log events; for example, you might attach an appender that sends the server log events to Syslog or the Windows Event Viewer. Additionally, you can use the Logger reference to issue log requests to WebLogic logging services; this requires that the Log4j libraries be available to your deployed application.

If your application has no requirement to interact with WebLogic logging services, package the Log4j libraries in the application's LIB directory. The server logging will continue to use the default Java Logging implementation.

Enabling Log4j Logging

To specify logging to a Log4j Logger instead of the default Java Logging:

* When you start the Administration Server, include the following Java option in the weblogic.Server command:

-Dweblogic.log.Log4jLoggingEnabled=true

* After the Administration Server has started, use the Administration Console to specify the Log4j logging implementation. See "Specifying the Logging Implementation" in the Administration Console Online Help.
* Use the WLST to set the value of the Log4jLoggingEnabled property and re-start the server.


The WLST commands to enable logging to a Log4j Logger in the Administration Server:

#invoke WLST
C:\>java weblogic.WLST

#connect WLST to an Administration Server
wls:/offline> connect('username','password')

#navigate to the writable MBean configuration tree
wls:/mydomain/serverConfig> edit()
wls:/mydomain/edit> startEdit()

#set cmo to the server log config
wls:/mydomain/edit !> cd("Servers/myserver/Log/myserver")

#set log4j logging to true
wls:/mydomain/edit/Servers/myserver/Log/myserver !> cmo.setLog4jLoggingEnabled(true)

#save and activate the changes
wls:/mydomain/edit/Servers/myserver/Log/myserver !> save()
wls:/mydomain/edit/Servers/myserver/Log/myserver !> activate()


You can enable Log4j for the server Logger as well as the domain Logger, which resides only on the Administration Server. The domain Log4j Logger reference is provided by invoking the weblogic.logging.log4j.Log4jLoggingHelper.getLog4jDomainLogger() method.

Log4j Code Example

import org.apache.log4j.Logger;
import weblogic.logging.log4j.Log4jLoggingHelper;
import weblogic.logging.LoggerNotAvailableException;

/**
* This example shows how to use the Log4j server Logger.
*/

public class MyLog4jTest {
public void testWLSLog4j() {
try {
Logger logger = Log4jLoggingHelper.getLog4jServerLogger();
logger.addAppender(myAppender); // The Appender is configured using either the log4j props file or other custom mechanism.
logger.info("Test log message");
} catch(LoggerNotAvailableException lex) {
System.err.println("Unable to get a reference to the log4j Logger: "+
lex.getMessage())
}
}
}


You have programmatic access to the Log4j Logger and its appenders (handlers) and layouts (formatters) for configuration purposes.

Java Logging is the default for client and server-side logging; Log4j is available only for server-side and not client-side logging.

The Concept of Classloaders

Classloaders, as the name suggests, are responsible for loading classes within the JVM. Before your class can be executed or accessed, it must become available via a classloader. Given a class name, a classloader locates the class and loads it into the JVM. Classloaders are Java classes themselves. This brings the question: if classloaders are Java classes themselves, who or what loads them?

When you execute a Java program (i.e., by typing java at a command prompt), it executes and launches a native Java launcher. By native, I mean native to your current platform and environment. This native Java launcher contains a classloader called the bootstrap classloader. This bootstrap classloader is native to your environment and is not written in Java. The main function of the bootstrap classloader is to load the core Java classes.


Figure 1; Classloader delegation hierarchy

The JVM implements two other classloaders by default. The bootstrap classloader loads the extension and application classloaders into memory. Both are written in Java. As mentioned before, the bootstrap classloader loads the core Java classes (for example, classes from the java.util package). The extension classloader loads classes that extend the core Java classes (e.g., classes from the javax packages, or the classes under the ext directory of your runtime). The application classloader loads the classes that make up your application.

All three default classloaders follow the delegation model. Before a child classloader tries to locate a class, it delegates that task to a parent. When your application requests a particular class, the application classloader delegates this request to the extension classloader, which in turn delegates it to the bootstrap classloader. If the class that you requested is a Java core class, the bootstrap classloader will make the class available to you. However, if it cannot find the class, the request returns to the extension classloader, and from there to the application classloader itself. The idea is that each classloader first looks up to its parent for a particular class. Only if the parent does not have the class does the child classloader try to look it up itself.

In application servers, each separately-deployed web application and EJB gets its own classloader (normally; this is certainly the case in WebLogic). This classloader is derived from the application classloader and is responsible for that particular EJB or web application. (Note that if an application is deployed as an EAR file--a combination of EJB and webapps--it gets one classloader, no more). This new classloader loads all classes that the webapp or EJB require that are not already part the Java core classes or the extension packages. It is also responsible for loading and unloading of classes, a feature missing from the default classloaders. This feature helps in hot deploy of applications.

When WebLogic starts up, it uses the Java-supplied application classloader to load the classes that make up its runtime. It then launches individual classloaders, derived from the Java application classloader, which load the classes for individual applications. The individual classloaders are invisible to the classloaders of the other applications; hence, classes loaded for one particular application will not be seen by another application.


Figure 2: Individual application classloaders

What if you want to make a single class available to all applications? Load it in a top-level classloader. This could be in the classpath of WebLogic. When WebLogic starts, it will automatically load this class in memory using the Java-supplied application classloader. All sub-application classloaders get access to it. However, the negatives of this approach are clear too. First, you lose the capability of hot deploy for this particular class in all individual applications. Second, any change in this class means that the server needs to be restarted, as there is no mechanism for a Java application classloader to reload classes. You will need to weigh in the pros and cons before you take this approach.

Cloud vs. Cloud Native

Introduction These days everyone is moving “On cloud”. Having many cloud vendors with lucrative offers of TCO reduction, does deploying yo...